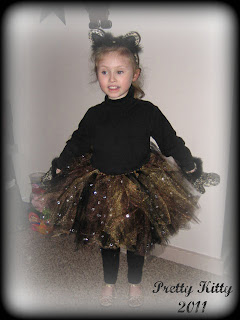
Usually by September, I know exactly what Kylie is going to be for Halloween and usually have everything ready. Well, this year, I had NOTHING ready at all!! I was drawing a total blank!
So, I began to browse websites, pay attention in stores, look through magazines and NOTHING was jumping out and me. Kylie wasn't attached to any idea either.
We were quite the undecisive pair.
Then, on a casual shopping trip, we were in a Clair's Boutique (which is Kylie's "routine" when we are in that particular mall) and we stumbled on a cat/leopard set. It was $12 and came with cat ears, cat tail, cat paws and a gemstone tattoo of a cat nose and whiskers (They must be sold out of it as I can't find it on the website. I'd post the link if I could find it).
I knew I had seen leopard print shoes at Target and my brain started churning out ideas faster than I could keep up.
(I also scored a leopard print coat at the Take2 Sale for $2.50 - cha ching!! I'm so excited!!)
We immediately went to the JoAnn fabric store and purchased 3 yards of Black, Brown and Tan/Gold tulle, 3 yards of elastic and then some clear (diamond looking) stick-on gems (in the dollar aisle).
I went home, measured my little one and went to work making the TuTu for her costume.
The process is really easy (and a no-sew project: my favorite!!)
1. Measure your child's waist, Then add 10 inches extra. (This is the excess you need to tie the tutu.)
2. Mark off the actual measurement of your child's waste on the elastic with 5 extra inches on either side.
3. Then measure The length you want the tutu to be and double that number.
4. Cut your tulle pieces 5 inches wide and make them as long as the number you figured in step #3
5. Tie the pieces of Tulle to the elastic (I like the effect of alternating the colors). Put 50% of your piece of tulle on one side of the elastic and 50% on the other side. Tie it in a knot.
6. Make sure you snug up each tied piece of tool to the next one (this will make your tutu extra fluffy)
7. Go all the way around the elastic until you have completed your child's waste measurement
8. Adhere your gemstones to the tulle in random order (I used a hot glue gun as the adhesive wasn't sticky enough)
Here's the finished product! (and I am sure there will be more and better pics to come closer to Halloween)
 |
| As you can tell, she LOVES it!! She has even been practicing her "meow" - so much fun!! |
Happy Halloween!!
Amy


No comments:
Post a Comment