Princess Ky Background - The cutest blog on the block

Thursday, November 10, 2011

Button Turkey Tutorial


If you have followed my blog for any length of time, you know that I am the queen of altering and adapting things.  I can't leave well enough alone and always have to put the "Amy spin" on things.

I am often inspired by things I have seen online or in my daily life, but they often don't quite work for my family or I get creatively inspired to enhance what I have seen to suit my taste/needs.


My Button Turkey is another one of those projects.

I first saw a Button Turkey here, here and here.

As you can tell (if you click on those links), there are only about 5 feathers for the child to work with.  This would be great for beginners, but I felt my daughter needed more of a challenge. 

So, I began to brainstorm how I could alter the design to better suit my daughter's needs.  Most of you already know that Kylie has poor strength in her hands, wrists and upper body in general, so I am constantly in search of activities that will work her fingers and help to increase that strength and coordination while also being fun, tactile and visually appealing.

Once I came up with my idea, I began to search for a pattern for the Button Turkey but never was able to find one, so I decided to create my own.

Yes, I am going to share it with you.  You can print it by clicking on the below image:

After clicking the image, click on the printer icon at the top right of your screen.  Select the size you wish to print (I suggest a full page).  You may also want to laminate the pieces for durability.  I found this to be very helpful.


You will want to cut out (in the felt colors/patterns of your choosing):
** 11 small feathers
** 11 large feathers
** 2 Circles for the body
** 1 cut out of all the other pieces (eyes, nose, waddle and head/neck).

Another reason I loved this idea/craft is that it is soooo inexpensive to make.  You probably have half the things you need right at home.

Supplies you will need:
**You will need Felt.  You can see the pics in this post to see the colors I chose. 

The one thing that I think is REALLY neat is the stamped/pressed felt that I used for the body.  It is called "cobblestone" and I found it at Michael's Craft Store.  I thought it really added some good texture and dimension to the project.


Isn't this cobblestone felt cool? It really makes the "body"

I also found some sparkly and patterned sheets of felt at Hobby Lobby.  All these little touches help keep it fresh and exciting when your child is buttoning 22 feathers.  

**You will also need a good pair of scissors that cut felt easily

**I used a disappearing ink felt tip pen to do my tracing (I found it at Walmart in the sewing section)

**You will need a needle and various color threads to match your felt turkey body colors.  I used mainly brown, red, orange and cream from a travel sewing kit I had stashed in a closet.

**You will need 24 buttons (I found mine at Michael's).  22 for the feathers (you can do 11 front and 11 back) plus 2 smaller buttons for the Turkey's eyes.

**You will need stuffing (optional) (Kylie had a stuffed animal with a hole in it, so I "borrowed" some stuffing from our formerly stuffed friend.)


Directions:

1. Print, laminate and cut out your pattern
2. Trace 11 large feathers and cut them out before the ink disappears
3. Trace 11 small feathers and cut them out before the ink disappears
4. Trace  2 circles and cut them out before the ink disappears
5. Trace 2 eyes, 1 waddle, 1 nose/beak and 1 head/neck and cut out before the ink disappears.  You may want to keep these pieces in a plastic baggy to keep them from getting lost.
6. Label the circle that will be the front of the turkey 
7. Position the small feathers around the front circle of your turkey.
8. Sew on the buttons to the front circle so the buttons correspond to your feathers.
9. Cut slits in the feathers to be used as button holes.
10. Repeat steps 6-9 for the back circle and the large feathers.
11. Set all of those pieces aside for now.
12. Sew the 2 buttons onto the eyes (I used blue small buttons on cream circles)
13. Attach the eyes (felt and buttons) to the head/neck (you can either sew by hand or use fabric glue
14. Sew or Glue the Waddle on to the Head/Neck
15. Sew or Glue the Nose/Beak to the Head/Neck
16. Sew or Glue the Head/Neck to the front circle.
17. Optional Step: place a little stuffing in the Head/Neck toward the end of your sewing to give it some "plump"
18. Glue or Sew (I prefer sewing by hand) the front circle of the body to the back circle of the body making sure all of the buttons are on the outside of the circles.
19. Optional Step: place a little stuffing between the circles before your sewing is complete to give it a little "plump"
20. Attach the small feathers to the front of the turkey
21. Attach the large feathers to the back of the turkey
22. Take A picture and send it to us.  =0)

Here are a few pics of the steps.

The feathers all cut out
Frontal view of the naked turkey
Rear view of the naked turkey. 
Notice I used two different colors/patterns of brown for the front and back of the body
Rear view with feathers attached.
Kylie just starting to put together her Turkey
This was a little workout for Kylie's fingers. 
The buttons I chose for the front added a level of difficulty
Kylie was a little trooper and really stuck with it. 
By the end, her little fingers were shaking, but she was a determined little girl.

Kylie LOVES her turkey!
Here is a little video clip of Kylie interacting with her Turkey.... Enjoy!!


And a final pic of the finished product.


I will praise the name of God with a song, And magnify Him with thanksgiving.
Psalm 69:30

Wednesday, November 9, 2011

FREE Thanksgiving Book and Printable Activities

Here are a few more activities that we have been doing lately.  I love that they are very tactile, colorful and very visually appealing to the eye.  Kylie is a more visual learner so these work perfectly for her.

Life Cycle of a Pumpkin
I have Kylie label each picture and then put them in order

 I found these GREAT activities and was inspired by MANY MORE here  (note: if you download this activity pack, it does take a few minutes as it is over 60 pages of activities)

For this one, she is to add the colored wiggle eyes (which I found at Michael's Craft Store) to each colored creature

 
I was able to customize this activity specifically for Kylie and I LOVE that personal touch!  It also worked out perfectly that the activity is based on/adapted from one of her favorite books: "Brown Bear, Brown Bear" by Bill Martin Jr/Eric Carle


See  how I was able to add Kylie's picture as the "trick-or-treater"? She loved seeing herself in the book!


I was so inspired by this personalized and adapted book that I decided to create a Thanksgiving Version as well! 

You can print the Thanksgiving Book by clicking the following images: 

After clicking on the images below, click on the printer icon at the top right of your screen, Choose what size you want to print the images (I suggest full page)


Once each sheet has printed, cut them apart and either bind them together with a binder ring or simply put them into a small photo album. 

This is also a great teaching tool for teaching your child about the First Thanksgiving.

I love the book "What is Thanksgiving?" and we love the Charlie Brown Thanksgiving dvd - they complement this activity beautifully!

We also have "Squanto and the Miracle of Thanksgiving". It is a GREAT resource for older children but will be too detailed for preschoolers.

I hope you are having a GREAT month reminiscing about all the things, people and memories you can be thankful for.

Be sure to stop back later in the week, I made the cutest turkey for Kylie to exercise her small motor muscles.... it will be coming soon!

Sunday, November 6, 2011

November Sensory Box

She found the little scarecrow hat right away.  Love her braids!

November is finally here and although I am still basking in the glory of all that our halloween was, I am excited to start a new month. 

This month's sensory box was a bit more tough as I wanted to focus on the Pilgrims, Mayflower and Squanto (the Native American) as well as giving thanks. 

I was quite frustrated with the lack of pilgrim/thanksgiving toys available.  It is really a shame when you think about it.  I suppose stores don't want to market the toys as there is such a focus on religion, but it is also the story of our country's beginning.  It is HISTORY!!

I am especially frustrated that Squanto gets such little recognition!  He saved an entire colony of people - which means he saved America!!  (not to mention he lost his entire family in the process)

Anyway... I found ways to adapt other toys and did find a few thanksgiving themed items.  Kylie is thrilled with her new sensory box and is learning about "Squasho" (as she started to call him - had to fix that pronunciation right away- but not until we got a few laughs out of it.)

Here are some pics of our November fun and learning.

This is what Kylie woke up to on November 1st. 
The base of the box is dried peas that Kylie can scoop and pour.  Then we have fall colored pom poms, leaves, Trees, clusters of faux grapes,  pumpkins and the Fisher Price Thanksgiving set
I love the detail on this set.  Very quality toy.
The pilgrims on the "Mayflower" - I had a TERRIBLE time finding a toy that looked like the Mayflower!  I finally found an Imaginext Pirate Ship that  I could alter to look like the Mayflower.
This is actually a very fun toy.  The sails go up and down, there are three cannons that actually shoot, if you turn the discs, the crew moves, the anchor drops and retracts, the plank extends and retracts.  Kylie has loved it!

Kylie loves this long pair of tongs.  She keeps trying to transfer those itty bitty peas with them.  I showed her the scoop - thinking that would be more fun, but she insists on using the tongs.  funny girl!!
Kylie has totally mutilated her grape clusters.  I found these cute grape clusters at Dollar Tree.  They come in green and purple and are really squishy.   She has pulled all of them off their stems (and, no, they don't go back on - remember it is Dollar Tree =0).  So, I gave her a little container to keep them in.  Now, Kylie sorts them by "blueberries" and "grapes" (with green being the grapes)
Little Miss November is feeling a bit giddy over her November Sensory Bin
These are the tools, scoops, tongs and containers she gets to use to play in her Sensory Box
I found the Turkey cup and bowl in the Target dollar section
A couple of these are from the Michaels sidewalk sale - less than $1

Over the course of the month, I'll share how we play in our sensory box.  I have to be honest - I was sad to put away October's box.  I had grown pretty attached to our Icky Sticky Sensory Stuff (you can read about it here too) - what fun!!

Don't worry, I have some fun ideas for November - Stay tuned and check back often!

Saturday, November 5, 2011

Halloween Helpers - A Love Beyond Measure

Halloween was successful for our Kylie ONLY because we had so many gracious and sacrificial helpers.  These are people who literally poured themselves into our Kylie. 

Proverbs 18:24 says that "...There is a friend who sticks closer than a brother"

That verse applies to this situation - especially since Kylie does not have any siblings.  Our friends and helpers have become our family.  I don't care if that is a conflict of interest in some areas (such as with therapists).  These key people are as close to us as family.  And it is no wonder!!  We are with them up to 4 times a week.  They know intimate details of our lives and we trust them.

These special people in Kylie's life have helped us in so many ways.  They walk with us daily in our Autism Adventure!

Here are a few of the many people who love on our precious girl.  How I wish I could picture them all.

Miss Kimberly - a friend and also one of Kylie's Respite Providers. 
Kylie looks unhappy because she didn't like the sound of the helium machine.
Kylie loves that Miss Kimberly can make her balloon animals - especially pink puppies.

Kylie's friend, Anna. 
Anna has been so patient and sweet with Kylie.  Kylie has had to learn how to be a friend, how to tolerate people in her personal space, how to enjoy the squeals of little girl laughter and delight.  These things don't come natural for our girl, but Anna continues to be such a good and patient friend to our Kylie. 
Kylie's Papa and Grammy Stout
Papa and Grammy's home has become a haven of peace for our Kylie.  She is with them weekly and enjoys every minute of her time with them.  It has been neat to watch their relationship grow and develop over time.   They allow us to dress Kylie for her Halloween Adventures every year at their house.
Kylie and her friend Rebecca. 
Kylie and Rebecca share the same speech therapist.  We often run into Rebecca and her family when we are out and about at various community events.  It is always so much fun to find friends in common.
Amelia and Lauren are sisters and they share an Occupational Therapist with Kylie.  They are also in a social group together.  Amelia, Lauren and their parents have become good friends of our family this year.  We have (too) much in common  =0)
I also LOVE this pic as it looks like Kylie is wearing a fur bra!  (oh, don't be fuddy duddies - it's funny!)

These three (Ellen, Chloe and Elizabeth) are Kylie's helpers at Dance Without Limits (we love them all).  DWOL is a ballet program sponsored by Ballet Des Moines specifically designed for children with special needs.  This program has been such a blessing and joy to our family!  Kylie has class every week at the School of Classical Ballet and Dance and it happened to fall on Halloween so the class was invited to wear their halloween costumes!  It was great fun!  They even did a spooky dance! Monika Peltz is Kylie's Dance Instructor and she is so wonderful with these kids!

And then there is all the staff at ChildServe.  If I have not mentioned it before now, we LOVE, love, love Childserve and all they have done and continue to do for our family!  These are just a few of the special things they did to make Halloween fun for all the children.

Erin (dressed as "Slinky Dog") is Kylie's Occupational Therapist, Julie (dressed as a friendly witch) is Kylie's Speech Therapist and Mary (dressed as Cookie Monster) is Kylie's Feeding Therapist (also an OT)
One of the other therapists (I wish I could remember her name) allowed Kylie to play Tic Tac Toe.  Kylie had a "Cat's Game"... How fitting for a "Pretty Kitty"  =0)
This is Marsha (as Minnie Mouse).  She is another of Kylie's Occupational Therapists.  Marsha is really creative.  You can't see her shoes, but she took old croc shoes and covered them in yellow duct tape and then used yellow glitter glue to make Minnie Mouse Shoes.  Marsha is also the one who came up with the game "Lucky Pumpkins"

And THIS, by FAR, was the best part of Kylie's day...

This is two therapists and one of the gals who work the front desk. 
(I wish I knew their names so I could rave about them).
These gals were so gracious to my Kylie.  They aren't even her therapists and they took precious time out of their day to make her feel special!  Yep!  This is why we LOVE Childserve.
One of the princesses let Kylie wear her crown -
It was a sacred moment for Kylie.
To top off Kylie's day, Her therapists invited her to play her favorite game: Duck Duck Goose!!  Kylie was in Heaven!!

It literally took a village to make Halloween a success for Kylie, but all these people and so many more helped to make her weekend special!!

Thanks to everyone who lavishes their love on our baby girl!  Our meager Thanks will never be enough but know you hold a special place in our hearts and we will never forget!

Friday, November 4, 2011

Halloween Highlights - Our Pretty Kitty


Yes, I am a Christian and I DO "celebrate" Halloween.

(I think the big debate between fellow Christians is how they define the word "celebrate".)

Let me be clear. I do not celebrate witchcraft or Satan. Satan does not "get" a day in my family. We love Jesus, we teach Jesus and we follow Jesus.

To us, "celebrating Halloween" is defined as a big costume party with lots of candy.


This was the first year Kylie was interested in "checking out" her candy.  After every deposit, she would peer into her bag and announce what she was given.  I think she picked this up from the Charlie Brown Halloween special where the kids all do this and Charlie Brown sadly exclaims "I got a rock" - Poor Charlie Brown.
 In any event, Dan and I were tickled to see her do this.

I could go on and on about my personal conviction or position regarding Halloween, but you all are not here for a soap box sermon.

I will however share a link to a really good article that I recently read.  If you choose to comment on it or disagree with it, that is absolutely fine, but please be respectful to me and to my wonderful readers in the way you choose to comment. 

Here is the link to the article: "Hallowing Halloween"  (I think the author makes some really great points.  It certainly made me think)

On the flip side, a friend (and one that I really respect) suggested that I read the pamphlet "The Truth about Halloween". While I am interested in reading it, I really don't think it will change my mind about how our family chooses to "celebrate" Halloween or more specifically "Trick or Treat". 

I have come to realize that this topic is more of a "cultural" issue based on how one was raised or influenced even more than a "religious" issue as I know many truly faith based people who do and who do not "celebrate" Halloween and every single one of them has a very real faith. 

Each of us will be held accountable for our decisions and if we did the right thing for our particular family.  We had ALL better base our decision making on solid foundations.

Can God be glorified in and through the vehicle of Halloween?  I believe he can.

***stepping down from the soapbox***

Hopefully, you are here to see pics of my ADORABLE and super sweet baby girl and to hear about all the cute things she did while Trick or Treating.

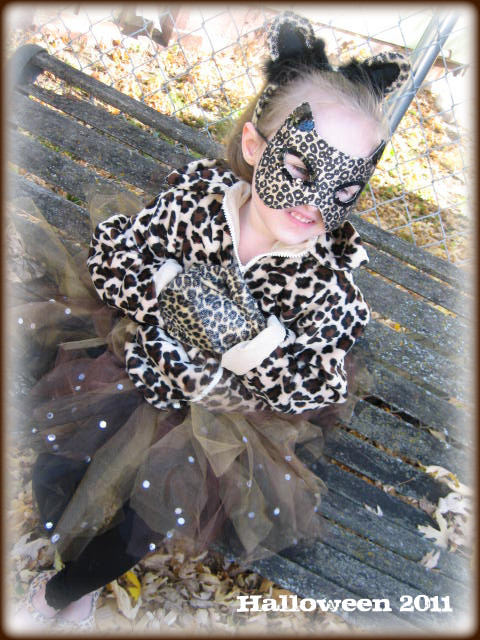
This year, Kylie's costume was a cat. You can read about how we came up with this idea and how we made her costume here. We called her a "pretty kitty".

To finish her costume I actually found the perfect mask at Michael's Craft Store the day before trick or treating. It matched her outfit perfectly and was the best $3 I could have spent.

Here she is all warm, cozy and ready to get some candy.
I have to share a story about this next pic.  All evening long, we had been prompting Kylie by saying "What do you say?" she would reply "Trick or Treat". 

Well, we came to this house where this older man was wearing a Jack Sparrow hat (The one from Pirates of the Caribbean.) It was a little intimidating as it had dreadlocks, but as he was not wearing any makeup, Kylie decided he was ok. 

As she approached the house, he stepped out onto the porch and we again prompted her with "What do you say?" She hesitated and you could just see her looking him up and down.  We again prompted her "What do you say?"  

 Kylie stepped up to him and said "Arrgghhh" in her best Pirate voice. 

All three of us adults burst into laughter.  Kylie had totally caught us off guard - it was PRICELESS!!  Such a funny and precious memory!


I just love looking at her little kitty tail!  ha! ha!

After trick or treating at the very last house. 
Chilly and ready to snuggle!!

I'm sure I'll share a few more memories in my next few posts.  I'm so proud of my girl.  Autism makes everything harder and the fact that she had such a successful time is monumental for us!!

Hope you enjoyed this little peek into our life!

Pumpkin with a Purpose (Alternative to Pumpkin Carving)


I loved this idea of putting our Christian beliefs into Fall and its' celebrations.
 (ok, so maybe I'm a little warped in my desire to make Satan mad). 

 I found this project to do with Kylie here 
(I so LOVE free printables)


I had Kylie paint the pumpkin and then cut it out.  Her painting and cutting skills have REALLY improved the last few months. 

I had previously cut out the eyes, nose and mouth as their specific shapes are vital to the project and the poem. 


We then pasted the poem (that Kylie cut out) on the back of our pumpkin paper.  I don't know if you can tell, but Kylie attempted to write her name - we need some work on that one.


Here is a close up on the poem, but since you can't read it very well, here it is:
 (note: I'm not sure who actually wrote the poem.  It might have been the owner of the blog 1+1+1=1 . I want to be sure to give credit to the artist)

I am a Jack o' Lantern
My lights will shine so bright
For I'm a Christian pumpkin
My symbols tell what's right.

My nose is like the cross
On which our Savior died
To set us free from sin
We need no longer hide

My mouth is like a fish
The whole wide world to show
That Christians live in this house
And love their Savior so!

The story starts at Christmas
My eyes are like the star
That shone on baby Jesus
And wise men saw from far

My color it is orange
Just like the big bright sun
That rose on Easter Day
Along with God's own son

And so on Halloween
Let's set our pumpkins out
And tell the trick or treaters
What God's love is all about.


Here is Kylie's finished pumpkin (Kylie glued on the eyes, nose and mouth as we read the poem). 

We hung it on our refrigerator and were sure to show it to Daddy and then again to Kylie's caregivers so they could all read the poem aloud to her and reinforce the message.


Another Great resource to reinforce this message is The Pumpkin Patch Parable book.

Be sure to file all these resources away for next year and make your fall purposeful!